Handling Galleries
We can handle galleries (folders) and it’s images from the server’s files. We don’t have to do anything other than, for example with FTP, upload the images to the correct folder and the images will appear automatically. In this case, the plugin’s one service will work: it will automatically generate the thumbnail if it’s neccessary.
In the options of the plugin, in the „Galleries” tab there are more possibilites. (Natirally, it’s also a correct option to upload the images through FTP and modify them on the interface.)
Handling Galleries
On the setup page of the plugin, the „Galleries” tab, you will be greeted by a similar screen:
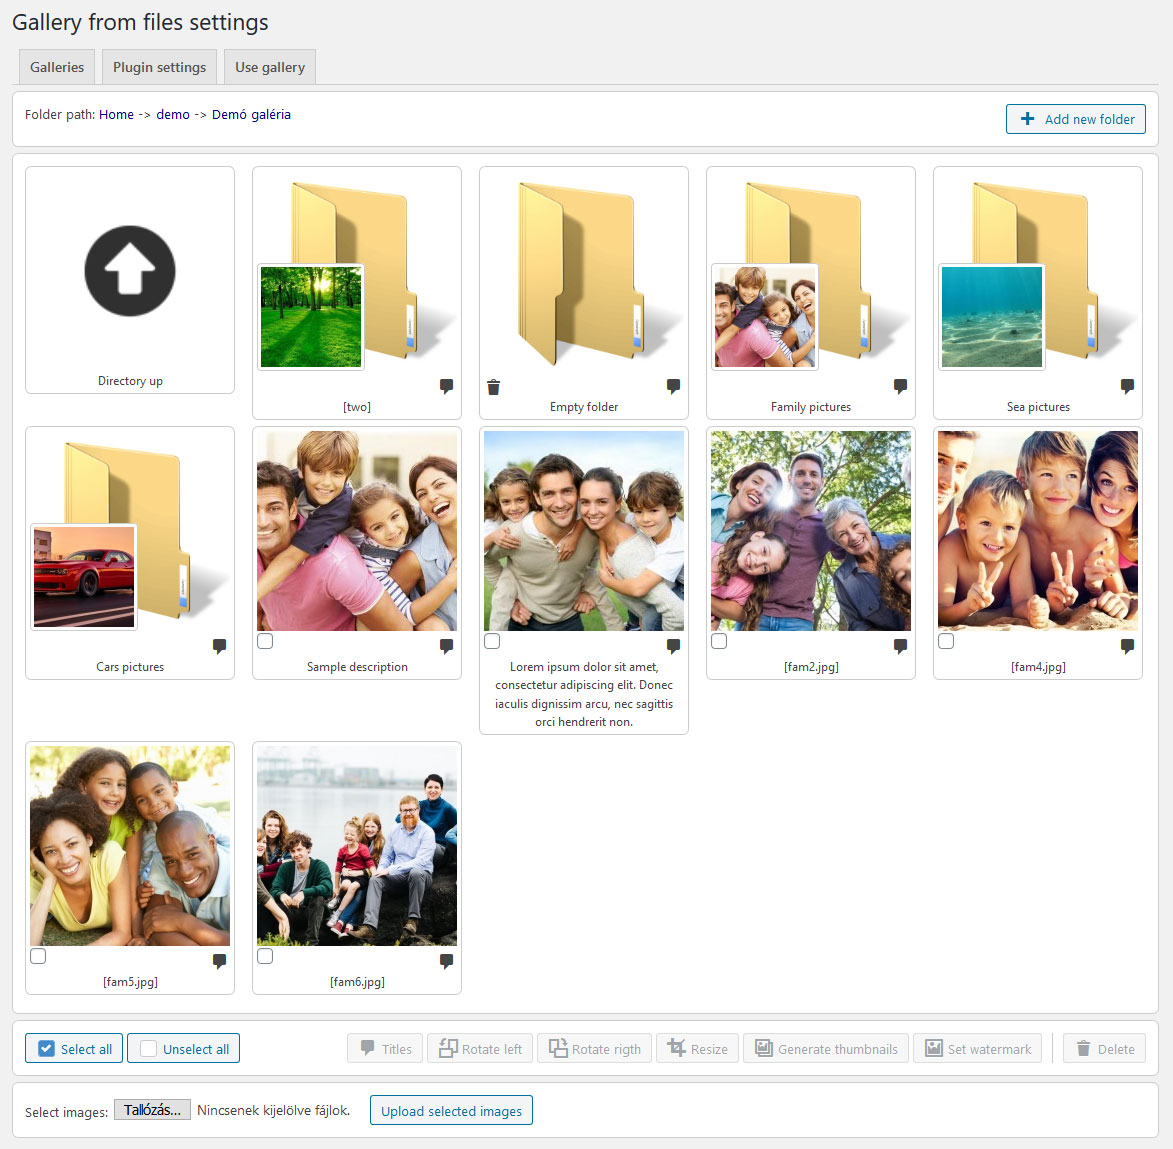
Handling the galleries on the backend
On the left, above there is a router that helps navigating, while on the right side with the „New folder” button you can create a new folder in the actual folder. (It will be on the last place in the order.)
Lower, additional folders and images are visible in the actual folder in one block. The order that you see is the so-called „set order”. By default the folders and the images on the page will be displayed according to this.
You can easily change the rorder by taking the chosen element and dragging it to the correct place. The plugin immediately saves this order. (It stores it in the filesort.txt file in the file system.)
Important! On this screen, you see everything, the folders in the folder and images. Here, the content isn’t placed onto different pages.
In case of folders – if the folder contains images – the system will display the first image to notify it. In this case, the folder here is not deletable. In case it’s empty, in the bottom left corner there is a trash can icon, if you click on it it will be deleted. (It doesn’t ask for affirmation!)
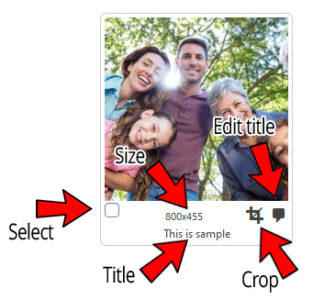 On the bottom right corner of the folders and the images, there is a text-bubble icon. Clicking on it, the folder or the image can be renamed. It’s important to know, that it doesn’t only modify the name, but the name of it in the file system in a way that it can only contain the english alphabet’s letters, numbers and dashes. (!With renaming, the file type of the files cannot be modified.)
Click the crop icon to crop a portion of the image. When selecting, it maintains the set aspect ratio taking into account the orientation of the image. After the cut, it re-generates the thumbnail.
Under the folders – put to the middle – their names are visible. Naturally, this can include accentuated letters. In case the folder or the image has not yet been named, it’s name from the file system will be displayed in square brackets.
The plugin reads and saves the names in the descript.ion ion file. A lot of programs – i.e. Total Commander – handles the file like when you copy a folder or an image, it will copy the description included with the file.
Group functions
For these functions, you need to select one or more images, which you want to execute them on. These functions can only be used on images. They must be highlighted or selected with the checkboxin the bottom left corner of the image, or use the „Select all” button. (What the „Unselect all” button does, I won’t tell you. 🙂 )
|
It renames the selected images to the same name. Since the renaming means renaming it in the file system as well, the file name will receive a number. (i.e.: test.jpg, test-1.jpg, test-2.jpg, …) |
|
|
Turns the selected images to the left, then regenerates the relevant thumbnail. |
|
|
Turns the selected images to the right, then regenerates the relevant thumbnail. |
|
|
Resizes the images according to the set image size. It doesn’t cut the image, only resize it. Regenerate thumbnail image. |
|
|
It creates the thumbnails by taking the largest piece from the middle of the images, then resizes it to the given size. In the actual folder in the file system, inside the folder with the name set through the options – which it creates automatically – saves the thumbnail. |
|
|
Creates the watermark for the selected images. This button only appears, if the watermark image is selected in the options, and is also available. The watermark is placed into the bottom-right corner of the image, which cannot be larger than the half of the width and height of the image. It resizes the watermark as well if required. If the original width or height of the watermark was larger than 80px, but the resized watermark would be smaller, it does not put the watermark on the image. (i.e.: it does not apply it to 80x80px thumbnails.) After creating the watermark, it does not create the thumbnail again! |
|
|
Deletes the selected images from |
Uploading images
There is a possibility to upload images in the bottom block of the folder. For the first step, we need to select the image after clicking „Browse” – in one step, multiple images can be uploaded, according to the size and amount limit from the server settings – then click on the „Upload selected images” button.
Warning! The process, depending on the amount and size of the images, could last longer!
While uploading, the following steps happen to all images:
- If neccessary, renames the image. (Deletes all accentuated letters, and gives it a number if there is already a file by this name.)
- The system moves the image from the temporary folder to the actual folder.
- If neccessary, resizes the image in the given size in the options. (Does not cut the image.)
- Creates the thumbnail.
- Adds the watermark according to the settings. (Doesn’t add to the thumbnail.)
When done, it will reload the page, where the newly uploaded images are visible.